I've had this sweater for a few years.... it's soft and cottony and I love it.... but.... I never wear it. One of those items you hang onto in hopes of one day wearing again.... But, honestly, do those days ever come? Usually not for me....
So, I took this as a sign.... A makeover kinda sign!
Here's what went down:
I took this 100% cotton American Eagle sweater that I bought for the low-low price of $9.99 (I know!)....
And started by doing this....
Then this....
Then this....
And this....
And this too....
And voila! A new cardi from a sweater that I loved....
Yay!
Showing posts with label fun. Show all posts
Tuesday, January 24, 2012
Wednesday, January 18, 2012
REFURB-RECON-REPURPOSE: old suitcase, new doll case
I've always loved the idea of making something old, new again, and when I saw these on Etsy, I knew I could easily do it myself.... and then, the hunt was on for the perfect case....
And, I found one....
Actually, Mr. Monkey found it on his very first trip with the girl-babe and I, to our nearest Bibles for Missions thrift store. This pretty blue case was sitting on the floor with a bunch of other sad looking cases.... a diamond in the rough for sure....
The price tag.... a WHOPPING $3.00! Yes, folks, this was the steal of the day!
So here it is.... the transformation....
I had so much fun whipping up this project! In total, it took me about 4 and a half hours.... well worth my time and effort just to get that HUGE smile from that BEAUTIFUL girl....
I think, later-later, I'll add some clear pockets to the top to house the socks and shoes, and maybe paint the monkey's name on the outside.... I'll be sure to add that as a REFURB-RECON-REPURPOSE post too!
I hope this inspires you glue-gun toting craft-goddesses to tackle your own repurpose projects. Have a lovely day my friends ;)
And, I found one....
Actually, Mr. Monkey found it on his very first trip with the girl-babe and I, to our nearest Bibles for Missions thrift store. This pretty blue case was sitting on the floor with a bunch of other sad looking cases.... a diamond in the rough for sure....
The price tag.... a WHOPPING $3.00! Yes, folks, this was the steal of the day!
So here it is.... the transformation....
| original condition, ok, but, not really... and still has it's keys! |
| let the stripping begin - woo-hoo!!! |
| interesting.... butter cookie packaging as backing.... repurposing, I LOVE IT! |
| original lining stuck.... ah, no biggie |
| completely NAKED! |
| vintage sheeting fabric, batting, glue gun, and many-many-many glue sticks |
| pretty trims, not sure what to use just yet.... |
| fitting and gluing the batting, really just winging it....until.... |
| OUCHIE! why does this ALWAYS happen to me? |
| burnt fingers forgotten.... bottom lining finito! |
| glue and press, glue and press.... top lining also finito! |
| cutting, trimming, fitting and attaching the pretty flowers |
| oops, forgot to take a shot of the trim being applied, my bad, here it is finished |
| the monkey-girl throwing in Bear's clothes before I could finish, love her excitement |
| 'take a pitcher of me, mommy!' (heart melting) |
| DONE! and PACKED! |
I think, later-later, I'll add some clear pockets to the top to house the socks and shoes, and maybe paint the monkey's name on the outside.... I'll be sure to add that as a REFURB-RECON-REPURPOSE post too!
I hope this inspires you glue-gun toting craft-goddesses to tackle your own repurpose projects. Have a lovely day my friends ;)
Labels:
crafts,
fun,
inspiration,
lovely things,
re-construct,
re-furbish,
refurb-recon-repurpose,
thrifting
Monday, January 16, 2012
THRIFTY MONDAY: is back!
While out driving around last tuesday, my husband and I decided to head to one of our favourite Antique-y places.... Southworks. He was looking for chairs for our dining set.... I was just looking at, well, everything...
The entire upper floor of this building is all antique, nostalgic and vintage treasures.... Now, being the thrifty (cheap) lady that I am, I find a great number of things here are highly overpriced. That doesn't mean I don't like the hunt, I do. It's a challenge to find something I like and for a reasonable price (or priced right).... but, I can do it if I'm given the time to really scrutinize what I'm after.
Of course, the prey of the day for me, was Pyrex.... just a little-teeny-tiny piece to quench my thirst, sate my hunger, tide me over til, um, next month (who we kiddin'....next week)....
Aaaanyway.... While browsing, I heard the man say to the girl-babe, 'Oh, Mommy's gonna be in these booths for hours'.... My interest was piqued.... I knew exactly what he meant, and so, calmly, not too-too hurriedly (I didn't want to look like a total geek!) I headed in the direction of his voice....
Ahhhh!!!! 3.... count 'em.... 3 booths of perfectly pretty Pyrex and fabulously fun Fiesta ware! WHAT?! I know!
So once the excitement (that was really only going on internally.... again, the geek in me was caged) was harnessed, I got down to business.
After picking up, turning over and checking for chips on almost every. single. piece.... sadly, only a few were to my liking, which is to say, in almost 100%, A-1, perfect condition. And those that were, were so over priced, I just couldn't bring myself to drop that kind of money....
But I wasn't sad.... I know where I can find what I like at very thrifty prices.... I went on my way, happy with just browsing at all of the beautiful colours.... and then, I spotted 3 teensy-weeny-little bowls on the floor of a booth that sold almost entirely old paper materials....
I chose this beautiful brown bitty....
Isn't she sweet? I brought her home, suds-ed her up and she was on the dinner table that night full to the brim with little sweet peas....
:D That's me. Smiling cheek-to-cheek.... have a great day ;)
The entire upper floor of this building is all antique, nostalgic and vintage treasures.... Now, being the thrifty (cheap) lady that I am, I find a great number of things here are highly overpriced. That doesn't mean I don't like the hunt, I do. It's a challenge to find something I like and for a reasonable price (or priced right).... but, I can do it if I'm given the time to really scrutinize what I'm after.
Of course, the prey of the day for me, was Pyrex.... just a little-teeny-tiny piece to quench my thirst, sate my hunger, tide me over til, um, next month (who we kiddin'....next week)....
Aaaanyway.... While browsing, I heard the man say to the girl-babe, 'Oh, Mommy's gonna be in these booths for hours'.... My interest was piqued.... I knew exactly what he meant, and so, calmly, not too-too hurriedly (I didn't want to look like a total geek!) I headed in the direction of his voice....
Ahhhh!!!! 3.... count 'em.... 3 booths of perfectly pretty Pyrex and fabulously fun Fiesta ware! WHAT?! I know!
So once the excitement (that was really only going on internally.... again, the geek in me was caged) was harnessed, I got down to business.
After picking up, turning over and checking for chips on almost every. single. piece.... sadly, only a few were to my liking, which is to say, in almost 100%, A-1, perfect condition. And those that were, were so over priced, I just couldn't bring myself to drop that kind of money....
But I wasn't sad.... I know where I can find what I like at very thrifty prices.... I went on my way, happy with just browsing at all of the beautiful colours.... and then, I spotted 3 teensy-weeny-little bowls on the floor of a booth that sold almost entirely old paper materials....
I chose this beautiful brown bitty....
Isn't she sweet? I brought her home, suds-ed her up and she was on the dinner table that night full to the brim with little sweet peas....
:D That's me. Smiling cheek-to-cheek.... have a great day ;)
Labels:
fun,
lovely things,
Pyrex,
thrifting,
thrifty monday
Sunday, January 15, 2012
FAMILY DAYS: production line
For Christmas, my middle monkey made me a button bracelet from the pretty buttons in my button stash. I saw the bracelet about a month before Christmas; but, had no idea it was for me. He put it together using a caramel coloured pipe cleaner and some shiny metal buttons (his favourites).
On Christmas morning, he handed me a pretty little box that he carefully wrapped himself. On top was the cutest little tag that was made from a thick piece of golden wrapping paper that he hand cut and folded.... on the inside it simply said, 'To: Mom. From: Marek' with a sweet happy face. My heart gushed and I had to hold back the tears.... I mean, really, I hadn't even opened the gift yet; but, I knew I would cherish it forever....
So, in his ultimate wisdom, and I'm sure after days of processing my tearful thank you to him, he came to me and said, 'I want to make button bracelets for our yard sale. Because if you like yours so much, so will other Mommy's.' My heart exploded, and I knew, even more than I had ever known before, that these moments were the reason I wanted to be a Mom.
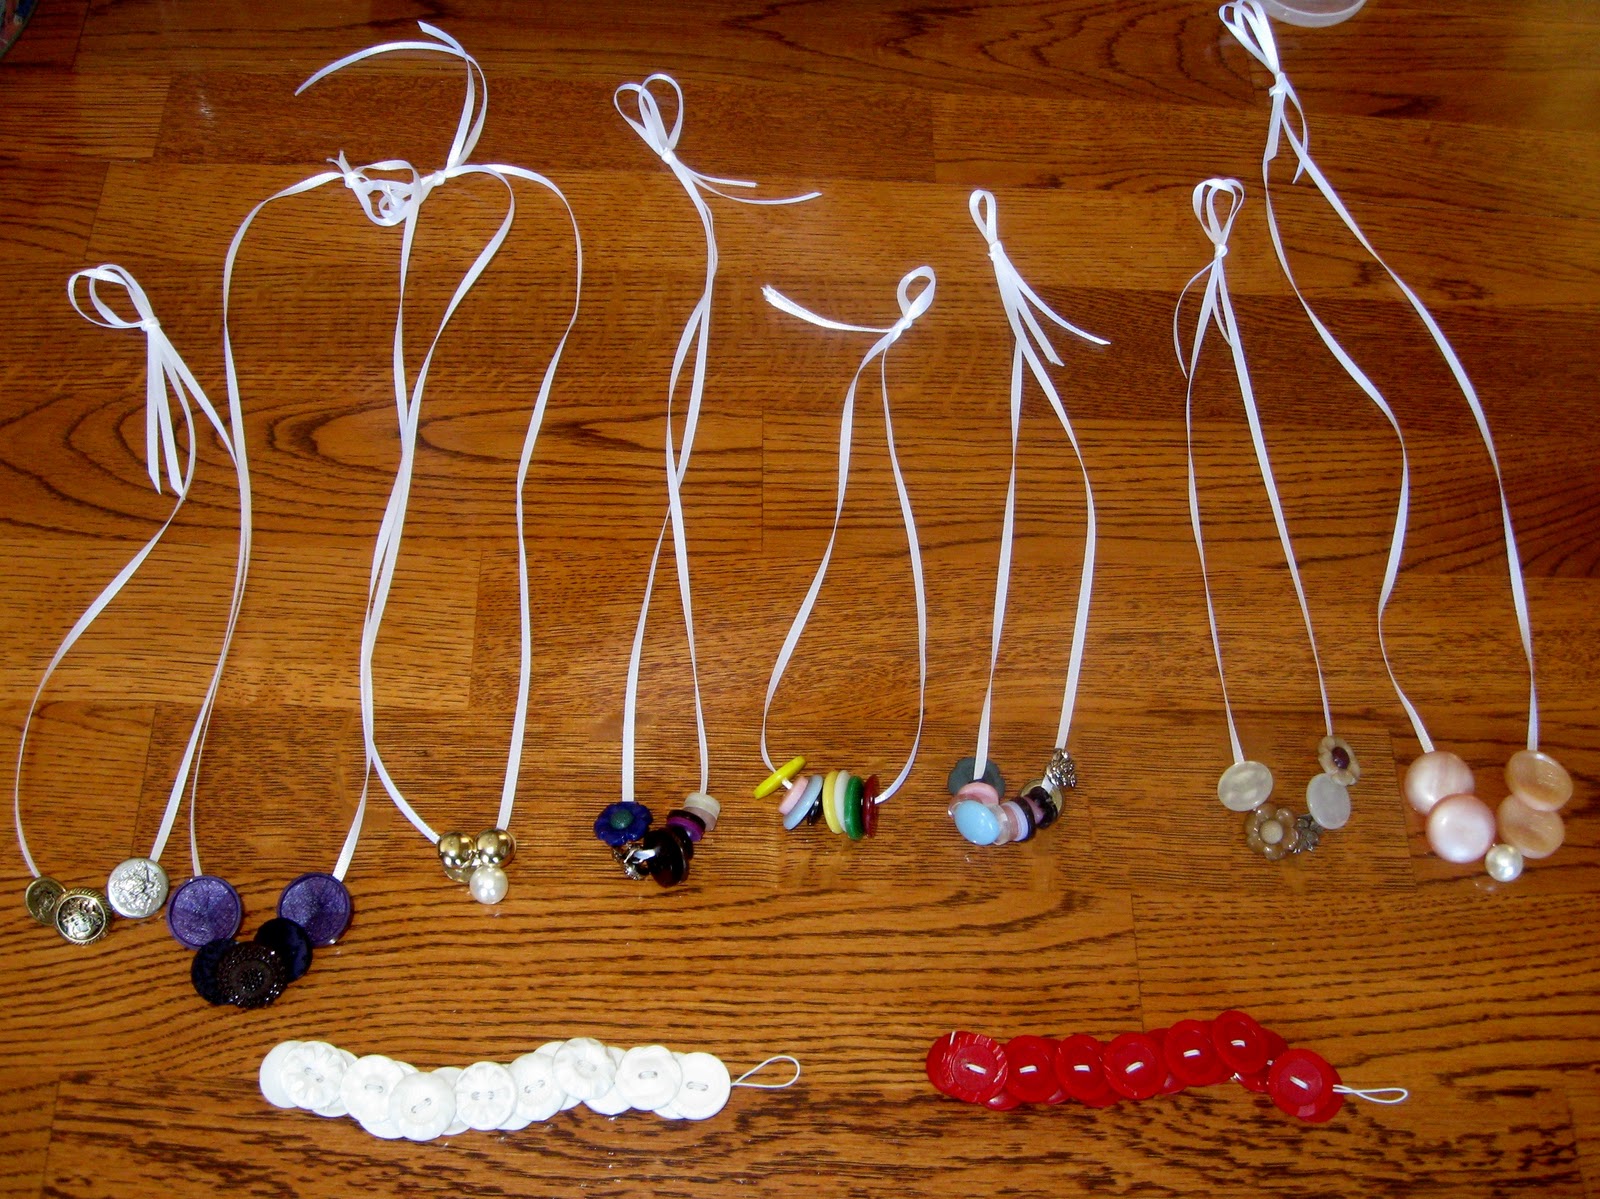
And today, on this frigidly cold Sunday, we decided to start production in the button factory. I'll I just say this.... I was in my crafty glory, sitting with my three monkeys, working away, watching them sort through the ga-zillions of buttons we have.... These pretty necklaces and bracelets are the fruits of our efforts today....
For girls; pretty ribbon and button necklaces made by the hands of my two boy monkeys, with help picking colours from the girl-babe; and elastic threaded bracelets made by Mommy. My oldest monkey had the brilliant idea to make army man necklaces for boys.... so this week we'll be taking a trip to the dollar store for some army men and hemp lacing....
I love that they want to have their own sale table for our annual community yard sale. I love the initiative, and the excitement they feel over doing something for themselves; and the pride they have in their ideas and finished product....
They make me love them more and more every. single. day.
Happy family day everyone ;)
p.s. stay tuned, we're back in the swing of things here on the blog.... starting tomorrow!
On Christmas morning, he handed me a pretty little box that he carefully wrapped himself. On top was the cutest little tag that was made from a thick piece of golden wrapping paper that he hand cut and folded.... on the inside it simply said, 'To: Mom. From: Marek' with a sweet happy face. My heart gushed and I had to hold back the tears.... I mean, really, I hadn't even opened the gift yet; but, I knew I would cherish it forever....
So, in his ultimate wisdom, and I'm sure after days of processing my tearful thank you to him, he came to me and said, 'I want to make button bracelets for our yard sale. Because if you like yours so much, so will other Mommy's.' My heart exploded, and I knew, even more than I had ever known before, that these moments were the reason I wanted to be a Mom.
And today, on this frigidly cold Sunday, we decided to start production in the button factory. I'll I just say this.... I was in my crafty glory, sitting with my three monkeys, working away, watching them sort through the ga-zillions of buttons we have.... These pretty necklaces and bracelets are the fruits of our efforts today....
For girls; pretty ribbon and button necklaces made by the hands of my two boy monkeys, with help picking colours from the girl-babe; and elastic threaded bracelets made by Mommy. My oldest monkey had the brilliant idea to make army man necklaces for boys.... so this week we'll be taking a trip to the dollar store for some army men and hemp lacing....
I love that they want to have their own sale table for our annual community yard sale. I love the initiative, and the excitement they feel over doing something for themselves; and the pride they have in their ideas and finished product....
They make me love them more and more every. single. day.
Happy family day everyone ;)
p.s. stay tuned, we're back in the swing of things here on the blog.... starting tomorrow!
Labels:
crafts,
environmentally friendly,
family,
family days,
for the kids,
fun,
life,
lovely things,
monkeying around
Friday, January 6, 2012
RANDOMNESS: enjoying my time
I know I said I would be back to the regular schedule once January hit.... I've just been having too much fun with my babes. They don't go back to school until next week, and it's been nice just spending time....
We visited the library.... we read a TON of books.... we played barbies, nerf guns, learned magic tricks, and packed Christmas away for another year.... we snacked, and snacked.... we laughed, and we chatted a lot!
Only a couple of days left and the boys will be back at school.... the Ham and I will be on our own again.... and Daddy will be with us on the days he's not working....
It's been a very lovely and relaxing start to the year....
See you soon.... promise
;)
We visited the library.... we read a TON of books.... we played barbies, nerf guns, learned magic tricks, and packed Christmas away for another year.... we snacked, and snacked.... we laughed, and we chatted a lot!
Only a couple of days left and the boys will be back at school.... the Ham and I will be on our own again.... and Daddy will be with us on the days he's not working....
It's been a very lovely and relaxing start to the year....
See you soon.... promise
;)
Tuesday, January 3, 2012
HOW-TO-TUESDAY: math helpers
When it comes to homework, I try to find the best ways to help my boys without adding to their frustrations (and mine).... and while math isn't a huge problem for them, I have found that making a set of counting grid cards has helped to make math a snap and a little more fun....
I found a great site, HomeSchoolMath.net. This is a fantastic site that allows you to generate your own grids, or to print ready-made grids.
I generated my own, without blank spaces (for math helping purposes); counting by 1's, 2's (odds and evens), and 5's. You can also print 10's and 25's and 100's, but you can also just use your counting by 5's grid for those numbers.
Here are two of ours....
As you can see, they're laminated. I can't tell you how much fun my guys have had with these being laminated. The added bonus of paying a little amount of money to do this is that it makes them dry erase. My guys love writing on white boards! And, you can pick up dry erase markers on the cheap at any dollar store.
Our grids are double-sided. When you print your grids from HomeSchoolMath.net, you'll be able to fit one on an 8.5"x11" sheet of printer paper. To make it double-sided, run your paper back through the printer so that the next grid prints on the backside of the first. Yeah, it's that easy!
And, here's a hint: for your counting by 5's grid, use a highlighter to colour code all of the counting options on that grid: 5's, 10's, 15's, 20's, 25's, etc, etc.... This should be done before the lamination process. I only did the 10's on ours, but next time, I'll use highlighter to colour the boxes in completely, and do all of the counting combinations.
So what can your child do with the counting grids? Well, counting, for one.... And both adding and subtracting. Predicting (what number comes next). Sequencing and patterning.... I'm sure as my guys progress through math and graduate into older grades, these grids will find new uses.
Another great little math helper, to assist the emergent adders and subtracters....
This is a blank helper that I made up, it shows the 1's, 10's and 100's columns, there's space at the top for carrying numbers, and space along the left to add your + or - signs.... All you need is a math equation and some dry erase markers. I'm taking our adding helper to be laminated today so it'll be ready for the boys when they return to school next week.
Please note: When the lamination process is done, do not cut too close to the paper as you'll create a separation in the laminate, and remember to round and cut corners as they are very, very sharp.
Hopefully these little helpers will aid in making homework time a little less stressful. Have a great day ;)
I found a great site, HomeSchoolMath.net. This is a fantastic site that allows you to generate your own grids, or to print ready-made grids.
I generated my own, without blank spaces (for math helping purposes); counting by 1's, 2's (odds and evens), and 5's. You can also print 10's and 25's and 100's, but you can also just use your counting by 5's grid for those numbers.
Here are two of ours....
As you can see, they're laminated. I can't tell you how much fun my guys have had with these being laminated. The added bonus of paying a little amount of money to do this is that it makes them dry erase. My guys love writing on white boards! And, you can pick up dry erase markers on the cheap at any dollar store.
Our grids are double-sided. When you print your grids from HomeSchoolMath.net, you'll be able to fit one on an 8.5"x11" sheet of printer paper. To make it double-sided, run your paper back through the printer so that the next grid prints on the backside of the first. Yeah, it's that easy!
And, here's a hint: for your counting by 5's grid, use a highlighter to colour code all of the counting options on that grid: 5's, 10's, 15's, 20's, 25's, etc, etc.... This should be done before the lamination process. I only did the 10's on ours, but next time, I'll use highlighter to colour the boxes in completely, and do all of the counting combinations.
So what can your child do with the counting grids? Well, counting, for one.... And both adding and subtracting. Predicting (what number comes next). Sequencing and patterning.... I'm sure as my guys progress through math and graduate into older grades, these grids will find new uses.
Another great little math helper, to assist the emergent adders and subtracters....
This is a blank helper that I made up, it shows the 1's, 10's and 100's columns, there's space at the top for carrying numbers, and space along the left to add your + or - signs.... All you need is a math equation and some dry erase markers. I'm taking our adding helper to be laminated today so it'll be ready for the boys when they return to school next week.
Please note: When the lamination process is done, do not cut too close to the paper as you'll create a separation in the laminate, and remember to round and cut corners as they are very, very sharp.
Hopefully these little helpers will aid in making homework time a little less stressful. Have a great day ;)
Friday, December 23, 2011
Christmas Friday Night Video 2011
Here's a classic Canadian Christmas Song....
Bob and Doug Mackenzie's 12 Days of Christmas....
Wednesday, December 21, 2011
COUNTDOWN: three
TROIS! TRES! KOLU! SAN! THREE!
3 shopping days left!
By now, you're really feeling the stress, maybe work is getting in the way of the finishing touches of that long list of people to buy for.... don't let it get you down. You still have options.
Gift cards!
Yes, I agree, they can seem not well thought out.... impersonal, even. Not true. Get creative. Find your nearest centre that sells a variety of different gift cards for retail outlets or attractions that aren't in your area. For us, around here, Shoppers Drug Mart and Rexall are THE best places to find amazing gifts!
You can seriously pick up any retailer or major restaurant chain gift card at either of these drug stores. And that's not it!
Last year, in a quest to find a great adventure trip for my husband, zip-lining (so. much. fun.), I came to find out that the place I wanted to take him had gift card adventure packages available for purchase at my local Shoppers Drug Mart. SCORE! It ended up being his main gift. WIN-WIN!
So, in short, don't underestimate the power of a gift card :P
Have a great day! ;)
Saturday, December 17, 2011
COUNTDOWN: seven
Only 7 shopping da-ays left til Chri-istmas....
Sorry, that's my attempt at singing in the tune of Twelve Day of Christmas :P
Give the gift of memories in the form of a family photo....
but, not just any family photo....
How about a fantastic photo throwback? What do I mean by throwback?
but, not just any family photo....
How about a fantastic photo throwback? What do I mean by throwback?
Well.... check out these fantastic retro-style photos....
The fifties family.... found on Pinterest
TOTALLY 80's.... Pinterest
60's couple found at My Retrospace
50's milkman and pregnant housewife, via Pinterest
Wouldn't it be so fun to do a hilarious retro-style family photo shoot?
Dress up, snap some shots, print the pictures and pop them into vintage thrift store frames!
Then gift them to Grans and Gramps everywhere!
This is SO happening next year!
Have fun photo-shooting!
;)
Friday, December 16, 2011
COUNTDOWN: eight
Only EIGHT.... count 'em, EIGHT, shopping days left! 1-2-3-4-5-6-7.... ummmm, 8!
For the young people in your life... There's nothing better than rolling, squishing, and molding play dough. It's a fantastic material that sparks creativity in children and adults alike.... AND! Bonus.... is so very simple to make big batches yourself!
Another project pulled from 3 monkeys archives....
Snowflake Play Dough,
first posted here in winter 2009....
| Sorry for the poor quality photo; but, it's hard to capture sparkles :P |
2 cups white flour
1 cup table salt
2 tablespoons cream of tartar (what else do you use this strange stuff for????)
1 tube of white, pink or light blue opalescent glitter (I used about a 1/4 of a cup, but certainly use your own discretion for this part)
In another bowl/measuring cup/or some sort of liquid holding vessel, combine:
2 cups boiling water
1 tablespoon of oil
Add liquid to dry ingredients and mix well. Depending on what it feels like after all of your ingredients are mixed, you may need to add more flour if too smushy or more oil of too dry. Once it has cooled enough to hold, kneed it together until it feels smooth. Then package it in freezer bags or wrap it in plastic wrap. VOILA! Pretty sparkly "Snowflake" Play Dough.
Alternatively; you can omit the glitter(or not) and add liquid food colouring (with the liquids, of course), or two packages of kool-aid (for colour) to the dry ingredients. I use neon liquid food colouring and it makes very vibrant coloured play dough (and hands while making it)... the kool-aid makes nice pastelly colours with a great smell. For very intense colours, you can try sourcing out powdered food colouring. If there is a cake decorator in your area, they may be able to hook you up with powdered/paste food colouring sources.
Package this together with a short, thick dowel that can be used as a rolling pin, a bunch of fun cookie cutters and wooden craft sticks to use as knives to cut the dough.
Super easy gift that is sure to please!
Have a lovely day.... ;)
Sunday, December 11, 2011
FAMILY DAYS: craft show
While daddy is working away keeping people safe, the monkeys and I will be going to a 'Giant Craft Show' in our little town.
We've never been before, so it should be fun.... I have one monkey (the oldest) who really doesn't want to go; however, once he gets there I'm sure I'll be hearing a lot of "can you buy this for me?".... the middle monkey, is just like me, he loves anything crafty-artsy-handmade (that's how I know we were meant to be).... and well, the monkey-babe, she just tags along and will undoubtedly be 'hands-on' with EVERYTHING....
One thing's for sure, it will be an adventure - and one that I am happy to share with three out of four of the peeps I love most in this world....
Have a happy, happy family day my lovelies ;)
We've never been before, so it should be fun.... I have one monkey (the oldest) who really doesn't want to go; however, once he gets there I'm sure I'll be hearing a lot of "can you buy this for me?".... the middle monkey, is just like me, he loves anything crafty-artsy-handmade (that's how I know we were meant to be).... and well, the monkey-babe, she just tags along and will undoubtedly be 'hands-on' with EVERYTHING....
One thing's for sure, it will be an adventure - and one that I am happy to share with three out of four of the peeps I love most in this world....
Have a happy, happy family day my lovelies ;)
Thursday, December 1, 2011
Wednesday, November 30, 2011
SIMPLICITY
I know I've written about this before; but, it still amazes me how kids are thrilled by the simplest things....Sure the 'in' toys; the over-commercialized items that are thrown in our faces every time we turn on the tv or open up a flyer are what they desire, want and hope for.... these are what I like to call flash-in-the-pan objects.... they're liked and admired and played with for short periods then quickly forgotten and passed up for the tried and true. You know the ones, the toys that force kids to use their imagination.... because when it comes down to it, kids love creating their own play. It's inherent in a child's very make up. That's what they do - it's how they first begin to learn about the world around them. So why not nurture these sometimes forgotten forms of play?
I'm not saying that children shouldn't have some of the things they long for.... rather, they should be given a good mix of what they want and what they need to help foster their growing minds.
Aaaanyway.... I painted a set of wooden peg dolls for my daughter last year for Christmas. One doll representing each person in our family. A fun little project.... painting. Painting.... my favourite artful thing to do. Every time I pick up a paint brush to do a project, I remember just how much I love doing it.... My daughter loves her set. She even found a little carry case for them.... And I'm certain she would have loved them and played with them just as much if they were left naked....
Anyhow, these little naked people beg me to dress them.... and I lovingly oblige. I just love choosing the colour of clothes, the hair, the personality.... and my favourite thing - giving them life at the very end by adding their little dotted eyes.
These four little ladies are so pretty.... and finished with a little sparkle.... what little girl doesn't LOVE sparkle? Every time I walk by them, they make me smile. Something so simple - and it brightens my day.... I hope the little lady who these will be gifted to, will feel smiley when ever she glances their way too.
A good rule to follow at this time of year.... keep it simple.
Have a great day folks ;)
p.s. REFURB-RECON,-REPURPOSE will return.... eventually....
I'm not saying that children shouldn't have some of the things they long for.... rather, they should be given a good mix of what they want and what they need to help foster their growing minds.
Aaaanyway.... I painted a set of wooden peg dolls for my daughter last year for Christmas. One doll representing each person in our family. A fun little project.... painting. Painting.... my favourite artful thing to do. Every time I pick up a paint brush to do a project, I remember just how much I love doing it.... My daughter loves her set. She even found a little carry case for them.... And I'm certain she would have loved them and played with them just as much if they were left naked....
Anyhow, these little naked people beg me to dress them.... and I lovingly oblige. I just love choosing the colour of clothes, the hair, the personality.... and my favourite thing - giving them life at the very end by adding their little dotted eyes.
These four little ladies are so pretty.... and finished with a little sparkle.... what little girl doesn't LOVE sparkle? Every time I walk by them, they make me smile. Something so simple - and it brightens my day.... I hope the little lady who these will be gifted to, will feel smiley when ever she glances their way too.
A good rule to follow at this time of year.... keep it simple.
Have a great day folks ;)
p.s. REFURB-RECON,-REPURPOSE will return.... eventually....
Saturday, November 26, 2011
Sunday, November 20, 2011
FAMILY DAYS: yummy-ness = togetherness
It doesn't matter how busy our week was, or what conflicts we've had, Sunday mornings are always reserved for this....
On today's menu: pumpkin spice, o.j. and earl grey.... cartoons and TONS of snuggles.... life is good.
Have a fantastic family day ;)
On today's menu: pumpkin spice, o.j. and earl grey.... cartoons and TONS of snuggles.... life is good.
Have a fantastic family day ;)
Saturday, November 19, 2011
Tuesday, November 15, 2011
HOW-TO-TUESDAY: marshmallow pops
Just wanted to share a super easy and super fun little treat that can be dressed up in so many different ways.... The Marshmallow Pop.
Here's what you'll need:
- marshmallows
- skewers, popsicle sticks or treat sticks
- melting chocolate
- decorating sugar, sprinkles or other candies
First, skewer marshmallows.
Melt chocolate. I generally use my microwave for this. Heat melting chocolate at 50% power for 30 seconds at a time, stirring after each increment.
For the next step, I like to remove the stick from the marshmallow and dip it into the chocolate, then replace it into the marshmallow. It will harden into place helping to keep the pop intact. Then dip the marshmallow into the chocolate.
Decorate as desired.
Allow to cool. Pour rice or dry beans into a container and insert the pop sticks into it to keep them upright to dry.
If you're giving the pops away as a treat for a birthday party or class party, wrap in sucker bags and tie with a nice ribbon. These are the ones I made for my little lady's birthday party last Sunday.... I had fun making them, and I can't wait to make more for other holidays, birthdays or a special treat any day!
Think of all the possibilities! Check out these fun and tasty treats!
Have a super fun day ;)
Here's what you'll need:
- marshmallows
- skewers, popsicle sticks or treat sticks
- melting chocolate
- decorating sugar, sprinkles or other candies
First, skewer marshmallows.
Melt chocolate. I generally use my microwave for this. Heat melting chocolate at 50% power for 30 seconds at a time, stirring after each increment.
For the next step, I like to remove the stick from the marshmallow and dip it into the chocolate, then replace it into the marshmallow. It will harden into place helping to keep the pop intact. Then dip the marshmallow into the chocolate.
Decorate as desired.
Allow to cool. Pour rice or dry beans into a container and insert the pop sticks into it to keep them upright to dry.
If you're giving the pops away as a treat for a birthday party or class party, wrap in sucker bags and tie with a nice ribbon. These are the ones I made for my little lady's birthday party last Sunday.... I had fun making them, and I can't wait to make more for other holidays, birthdays or a special treat any day!
Think of all the possibilities! Check out these fun and tasty treats!
![]() |
| http://www.verybestbaking.com/recipes/128879/Marshmallow-Pops/detail.aspx |
![]() |
| http://kitchenrunway.com/marshmallow-pops/ |
![]() |
| http://maddycakesmuse.blogspot.com/2010/10/halloween-marshmallow-pops.html |
![]() |
| http://bestfriendsforfrosting.com/2011/10/winter-snowman-marshmallow-pops/ |
Have a super fun day ;)
Subscribe to:
Posts (Atom)