Who doesn't LOVE brownies? Chocolate-y, crumbly outside, chewy-ewwie-gooey inside.... and so-so sinfully decadent.... I mean, full of calories.
So, how can you have your favourite chocolate snack and NOT feel guilty after? Easy. Makeover your recipe.
With a few small changes you can cut the calorie count considerably and still get the fix you were looking for.
Today, I'm going to show you how I made over this recipe, from BAKER'S Chocolate and Kraft Canada. The original recipe calls for a large amount of both butter and sugar. By cutting these two ingredients down and adding one other thing, you can save yourself from indiscretion.
Here we go.
Julie's Skinny-ish Brownies
You'll need:
4 squares Baker's Semi-sweet Chocolate
1 tbsp Becel Salt-Free Margarine
1/4-1/2 cup sugar
1 ripe mashed banana (or 1 Motts snack cup unsweetened applesauce)
3 whole eggs (or 1 whole and 4 egg whites if you have cholesterol issues)
1tsp vanilla
1 cup flour (white, whole wheat or nutri-blend)
Melt chocolate and margarine in microwave for 1-2 minutes, stir til chocolate is free from lumps. Add eggs, vanilla and banana and mix well. Add flour and stir til combined. If you're not totally counting every calorie, fold in a bunch of chocolate chips too, maybe about a half cup ;)
Pour into a 13x9 greased foil-lined baking dish. Bake for 25-35 minutes in a preheated 350 degree oven. Test the brownie to make sure they're done by inserting a knife or toothpick.... you know the drill.
They should resemble something like this....
Judging by the 'oohs and ahs' I got from the family, I'd say they were a hit. The banana adds a bit of flavour that melds well with the chocolate and gives that extra hit of sweetness. Hope you like them too!
Have a fantastically fudge-y day ;)
Showing posts with label for the kids. Show all posts
Tuesday, January 17, 2012
Sunday, January 15, 2012
FAMILY DAYS: production line
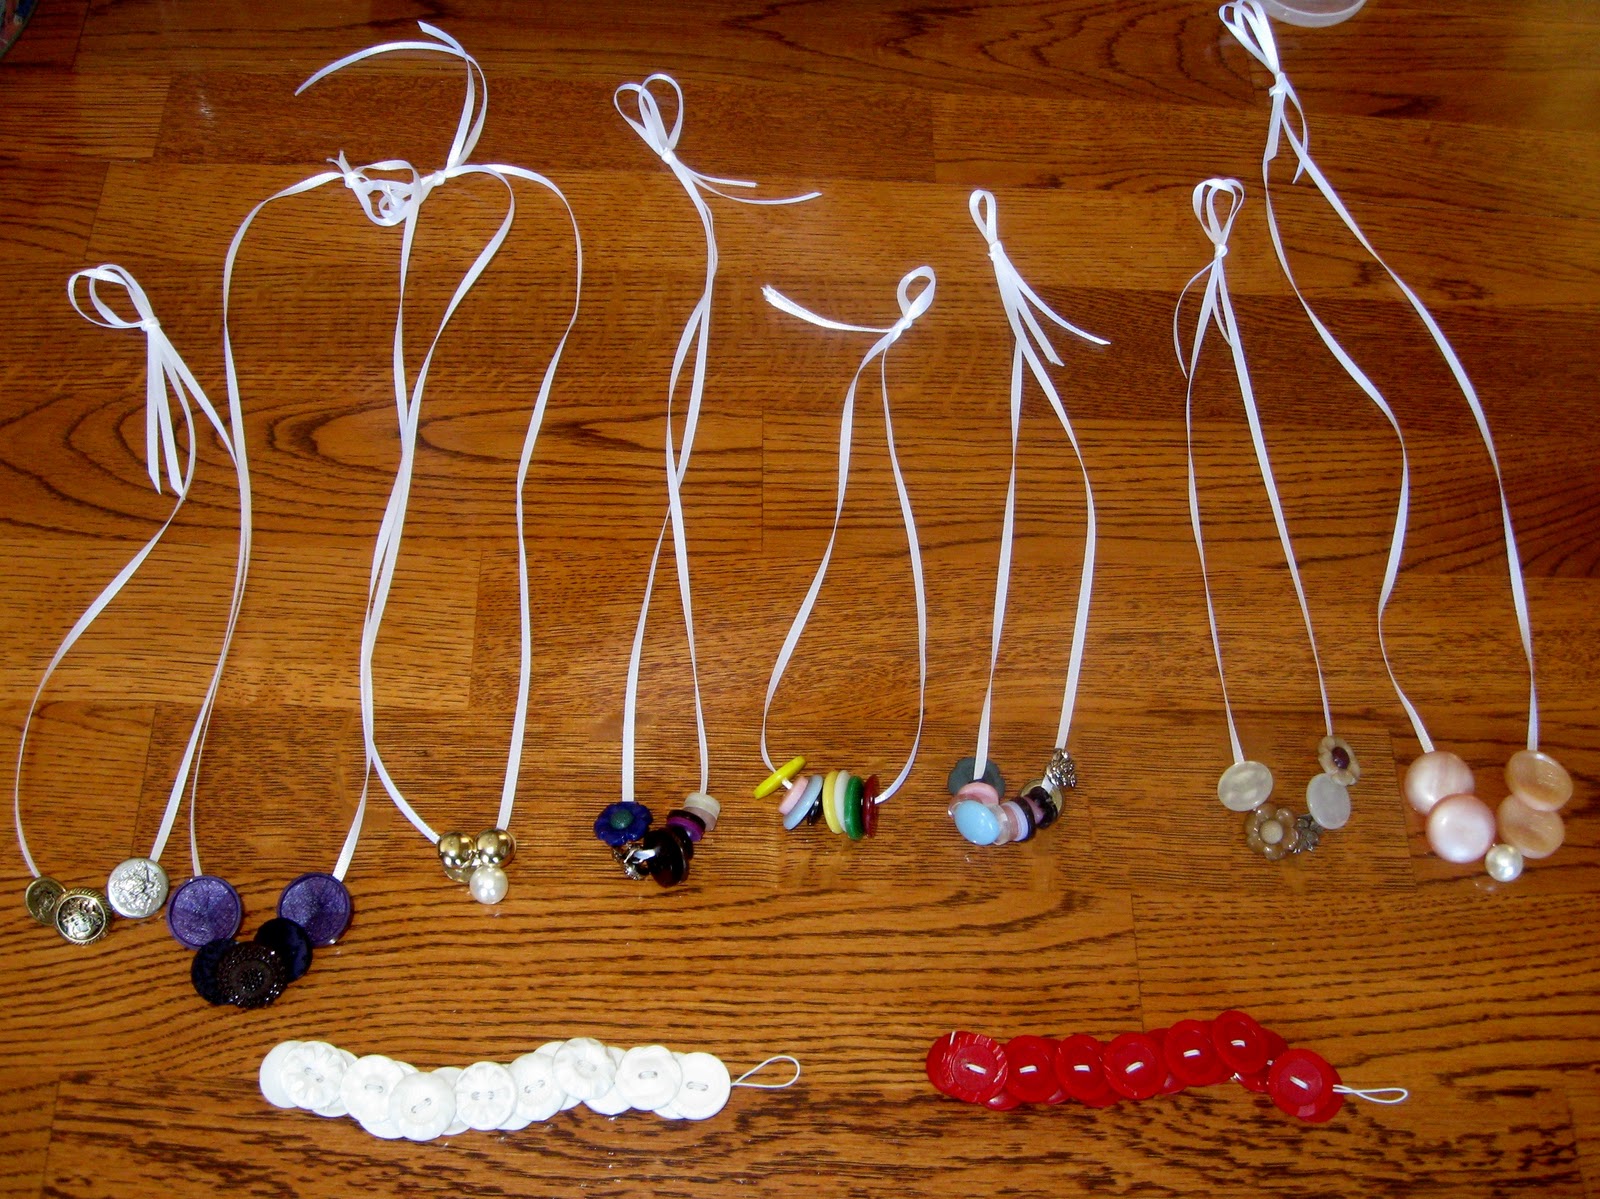
For Christmas, my middle monkey made me a button bracelet from the pretty buttons in my button stash. I saw the bracelet about a month before Christmas; but, had no idea it was for me. He put it together using a caramel coloured pipe cleaner and some shiny metal buttons (his favourites).
On Christmas morning, he handed me a pretty little box that he carefully wrapped himself. On top was the cutest little tag that was made from a thick piece of golden wrapping paper that he hand cut and folded.... on the inside it simply said, 'To: Mom. From: Marek' with a sweet happy face. My heart gushed and I had to hold back the tears.... I mean, really, I hadn't even opened the gift yet; but, I knew I would cherish it forever....
So, in his ultimate wisdom, and I'm sure after days of processing my tearful thank you to him, he came to me and said, 'I want to make button bracelets for our yard sale. Because if you like yours so much, so will other Mommy's.' My heart exploded, and I knew, even more than I had ever known before, that these moments were the reason I wanted to be a Mom.
And today, on this frigidly cold Sunday, we decided to start production in the button factory. I'll I just say this.... I was in my crafty glory, sitting with my three monkeys, working away, watching them sort through the ga-zillions of buttons we have.... These pretty necklaces and bracelets are the fruits of our efforts today....
For girls; pretty ribbon and button necklaces made by the hands of my two boy monkeys, with help picking colours from the girl-babe; and elastic threaded bracelets made by Mommy. My oldest monkey had the brilliant idea to make army man necklaces for boys.... so this week we'll be taking a trip to the dollar store for some army men and hemp lacing....
I love that they want to have their own sale table for our annual community yard sale. I love the initiative, and the excitement they feel over doing something for themselves; and the pride they have in their ideas and finished product....
They make me love them more and more every. single. day.
Happy family day everyone ;)
p.s. stay tuned, we're back in the swing of things here on the blog.... starting tomorrow!
On Christmas morning, he handed me a pretty little box that he carefully wrapped himself. On top was the cutest little tag that was made from a thick piece of golden wrapping paper that he hand cut and folded.... on the inside it simply said, 'To: Mom. From: Marek' with a sweet happy face. My heart gushed and I had to hold back the tears.... I mean, really, I hadn't even opened the gift yet; but, I knew I would cherish it forever....
So, in his ultimate wisdom, and I'm sure after days of processing my tearful thank you to him, he came to me and said, 'I want to make button bracelets for our yard sale. Because if you like yours so much, so will other Mommy's.' My heart exploded, and I knew, even more than I had ever known before, that these moments were the reason I wanted to be a Mom.
And today, on this frigidly cold Sunday, we decided to start production in the button factory. I'll I just say this.... I was in my crafty glory, sitting with my three monkeys, working away, watching them sort through the ga-zillions of buttons we have.... These pretty necklaces and bracelets are the fruits of our efforts today....
For girls; pretty ribbon and button necklaces made by the hands of my two boy monkeys, with help picking colours from the girl-babe; and elastic threaded bracelets made by Mommy. My oldest monkey had the brilliant idea to make army man necklaces for boys.... so this week we'll be taking a trip to the dollar store for some army men and hemp lacing....
I love that they want to have their own sale table for our annual community yard sale. I love the initiative, and the excitement they feel over doing something for themselves; and the pride they have in their ideas and finished product....
They make me love them more and more every. single. day.
Happy family day everyone ;)
p.s. stay tuned, we're back in the swing of things here on the blog.... starting tomorrow!
Labels:
crafts,
environmentally friendly,
family,
family days,
for the kids,
fun,
life,
lovely things,
monkeying around
Tuesday, January 3, 2012
HOW-TO-TUESDAY: math helpers
When it comes to homework, I try to find the best ways to help my boys without adding to their frustrations (and mine).... and while math isn't a huge problem for them, I have found that making a set of counting grid cards has helped to make math a snap and a little more fun....
I found a great site, HomeSchoolMath.net. This is a fantastic site that allows you to generate your own grids, or to print ready-made grids.
I generated my own, without blank spaces (for math helping purposes); counting by 1's, 2's (odds and evens), and 5's. You can also print 10's and 25's and 100's, but you can also just use your counting by 5's grid for those numbers.
Here are two of ours....
As you can see, they're laminated. I can't tell you how much fun my guys have had with these being laminated. The added bonus of paying a little amount of money to do this is that it makes them dry erase. My guys love writing on white boards! And, you can pick up dry erase markers on the cheap at any dollar store.
Our grids are double-sided. When you print your grids from HomeSchoolMath.net, you'll be able to fit one on an 8.5"x11" sheet of printer paper. To make it double-sided, run your paper back through the printer so that the next grid prints on the backside of the first. Yeah, it's that easy!
And, here's a hint: for your counting by 5's grid, use a highlighter to colour code all of the counting options on that grid: 5's, 10's, 15's, 20's, 25's, etc, etc.... This should be done before the lamination process. I only did the 10's on ours, but next time, I'll use highlighter to colour the boxes in completely, and do all of the counting combinations.
So what can your child do with the counting grids? Well, counting, for one.... And both adding and subtracting. Predicting (what number comes next). Sequencing and patterning.... I'm sure as my guys progress through math and graduate into older grades, these grids will find new uses.
Another great little math helper, to assist the emergent adders and subtracters....
This is a blank helper that I made up, it shows the 1's, 10's and 100's columns, there's space at the top for carrying numbers, and space along the left to add your + or - signs.... All you need is a math equation and some dry erase markers. I'm taking our adding helper to be laminated today so it'll be ready for the boys when they return to school next week.
Please note: When the lamination process is done, do not cut too close to the paper as you'll create a separation in the laminate, and remember to round and cut corners as they are very, very sharp.
Hopefully these little helpers will aid in making homework time a little less stressful. Have a great day ;)
I found a great site, HomeSchoolMath.net. This is a fantastic site that allows you to generate your own grids, or to print ready-made grids.
I generated my own, without blank spaces (for math helping purposes); counting by 1's, 2's (odds and evens), and 5's. You can also print 10's and 25's and 100's, but you can also just use your counting by 5's grid for those numbers.
Here are two of ours....
As you can see, they're laminated. I can't tell you how much fun my guys have had with these being laminated. The added bonus of paying a little amount of money to do this is that it makes them dry erase. My guys love writing on white boards! And, you can pick up dry erase markers on the cheap at any dollar store.
Our grids are double-sided. When you print your grids from HomeSchoolMath.net, you'll be able to fit one on an 8.5"x11" sheet of printer paper. To make it double-sided, run your paper back through the printer so that the next grid prints on the backside of the first. Yeah, it's that easy!
And, here's a hint: for your counting by 5's grid, use a highlighter to colour code all of the counting options on that grid: 5's, 10's, 15's, 20's, 25's, etc, etc.... This should be done before the lamination process. I only did the 10's on ours, but next time, I'll use highlighter to colour the boxes in completely, and do all of the counting combinations.
So what can your child do with the counting grids? Well, counting, for one.... And both adding and subtracting. Predicting (what number comes next). Sequencing and patterning.... I'm sure as my guys progress through math and graduate into older grades, these grids will find new uses.
Another great little math helper, to assist the emergent adders and subtracters....
This is a blank helper that I made up, it shows the 1's, 10's and 100's columns, there's space at the top for carrying numbers, and space along the left to add your + or - signs.... All you need is a math equation and some dry erase markers. I'm taking our adding helper to be laminated today so it'll be ready for the boys when they return to school next week.
Please note: When the lamination process is done, do not cut too close to the paper as you'll create a separation in the laminate, and remember to round and cut corners as they are very, very sharp.
Hopefully these little helpers will aid in making homework time a little less stressful. Have a great day ;)
Subscribe to:
Posts (Atom)